
Your Prevelo's air fork is one of the biggest upgrades your rider will feel on the trail, and setting the "sag" correctly is the single most important adjustment you can make. It takes about ten minutes, a shock pump, and a zip tie. This guide covers every current Prevelo air fork.
What is sag, and why it matters
Sag is the amount your fork compresses under your rider's weight when they simply sit on the bike at rest. A little sag is a good thing: it lets the front wheel drop into dips and stay in contact with the ground, which means more grip, more control, and a smoother ride.
- Too little sag (fork too firm): the ride feels harsh and the front wheel skips over bumps.
- Too much sag (fork too soft): the bike dives, wallows, and uses up its travel too easily.
Because every rider is a different weight, every fork needs to be set for the specific child riding it. You do this by adding or releasing air, so you will need a shock pump. A regular tire pump will not work and can damage the valve.
Which fork is on my bike?
Prevelo ships two families of air forks. The controls differ between them, so find your bike first.
| Bike | Fork | Travel | Family |
|---|---|---|---|
| Zulu Two HEIR MkII (16 in) | RST F1RST 16 Air | 60 mm | RST (trail) |
| Zulu Three MkII (20 in) | RST F1RST 20 Air | 80 mm | RST (trail) |
| Zulu Four MkII (24 in) | RST F1RST 24 Air | 100 mm | RST (trail) |
| Zulu Five MkII (26 in) | RST F1RST 26 Air | 100 mm | RST (trail) |
| Bravo Three (20 in) | Manitou JUNIT 32 Comp | 80 mm | Manitou (dirt jump) |
| Bravo Four (24 in) | Manitou JUNIT 32 Comp | 100 mm | Manitou (dirt jump) |
Tools you need
- A shock pump (Prevelo's Air Sender pump works perfectly). A shock pump has a fine gauge and a bleed button for small, precise adjustments.
- One zip tie.
- A wall or a helper to lean on.
- A tape measure or ruler.
Step 1: Find a starting air pressure for your rider
Both RST and Manitou publish a starting air pressure based on rider weight. Weigh your rider in their riding gear, pump the fork to the pressure in the chart for your fork, then fine-tune by sag in Step 2. These are starting points, not final answers.
RST F1RST forks (Zulu bikes)
RST F1RST 16 (Zulu Two HEIR MkII), 60 mm travel
| Rider weight | Air pressure |
|---|---|
| 30 lb (15 kg) | 15 to 20 psi |
| 45 lb (20 kg) | 25 to 30 psi |
| 60 lb (26 kg) | 30 to 35 psi |
| 75 lb (33 kg) | 35 to 40 psi |
| 90 lb (40 kg) | 40 to 45 psi |
RST F1RST 20 (Zulu Three MkII), 80 mm travel
| Rider weight | Air pressure |
|---|---|
| 30 lb (14 kg) | 20 to 24 psi |
| 45 lb (20 kg) | 30 to 36 psi |
| 60 lb (27 kg) | 40 to 48 psi |
| 75 lb (34 kg) | 49 to 59 psi |
| 90 lb (41 kg) | 59 to 71 psi |
RST F1RST 24 (Zulu Four MkII), 100 mm travel
| Rider weight | Air pressure |
|---|---|
| 40 lb (18 kg) | 31 to 37 psi |
| 60 lb (27 kg) | 46 to 55 psi |
| 80 lb (36 kg) | 62 to 74 psi |
| 100 lb (45 kg) | 77 to 92 psi |
| 120 lb (54 kg) | 92 to 111 psi |
RST F1RST 26 (Zulu Five MkII), 100 mm travel
| Rider weight | Air pressure |
|---|---|
| 88 to 132 lb (40 to 60 kg) | 50 to 70 psi |
| 132 to 176 lb (60 to 80 kg) | 70 to 90 psi |
| 176 to 220 lb (80 to 100 kg) | 90 to 110 psi |
Manitou JUNIT forks (Bravo bikes)
Manitou publishes a starting pressure, not a sag percentage.
Bravo Three (JUNIT 32, 20 in)
| Rider weight | Air pressure |
|---|---|
| 30 lb (14 kg) | 20 to 24 psi |
| 45 lb (20 kg) | 30 to 36 psi |
| 60 lb (27 kg) | 40 to 48 psi |
| 75 lb (34 kg) | 49 to 59 psi |
| 90 lb (41 kg) | 59 to 71 psi |
Bravo Four (JUNIT 32, 24 in)
| Rider weight | Air pressure |
|---|---|
| 40 lb (18 kg) | 31 to 37 psi |
| 60 lb (27 kg) | 46 to 55 psi |
| 80 lb (36 kg) | 62 to 74 psi |
| 100 lb (45 kg) | 77 to 92 psi |
| 120 lb (54 kg) | 92 to 111 psi |
Never exceed 120 psi (8.3 bar) in any of these forks. This is the manufacturer maximum for both RST and Manitou.
Step 2: Check and set sag
Pressure charts get you close. Sag gets you dialed. Here is how to measure it.
- Find the air valve and attach the pump. Remove the cap from the fork's air valve and thread on your shock pump. It does not need to be cranked down hard, just snug enough to press the valve pin in and seal. A short hiss as it seats is normal. On the Zulu (RST) forks, the air valve is under the cap marked "AIR" on the right leg (see "Know Your Controls" below). On the Bravo (Manitou) forks, it is the single Schrader valve under a cap on the fork.
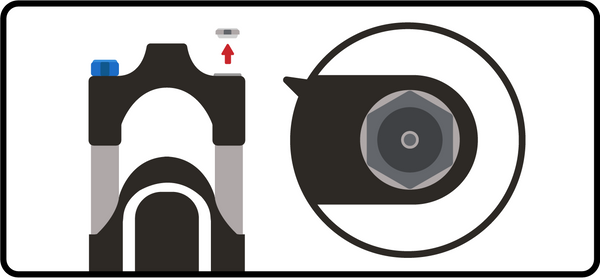
Remove the valve cap. 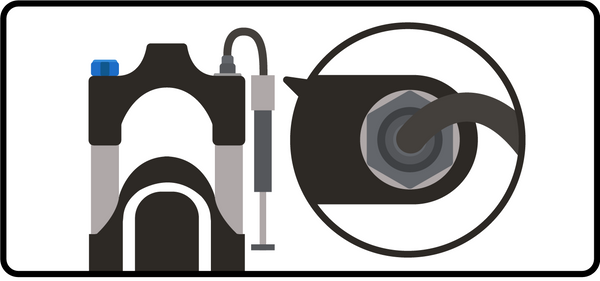
Thread on the shock pump just enough to seal. - Set your starting pressure from the chart in Step 1.
- Cycle the fork. Push down firmly on the handlebars and let the fork compress and rebound five to ten times. This balances the air spring so your reading is accurate. This matters most on lighter riders.
- Add a zip tie (or use the fork's O-ring). Many forks already have a thin rubber O-ring around one of the shiny upper legs (the "stanchion") for exactly this purpose. If yours has one, use it and skip the zip tie. Otherwise, slide a zip tie around the stanchion. Either way, push it down against the rubber seal where the leg enters the lower fork.
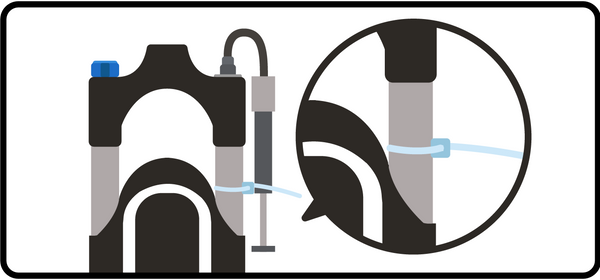
Rest the zip tie against the seal. - Have the rider get on. In normal riding gear, holding a wall or a helper, the rider sits on the saddle with hands on the grips and feet on the pedals, putting as much weight on the bike as possible. They should settle gently, without bouncing.
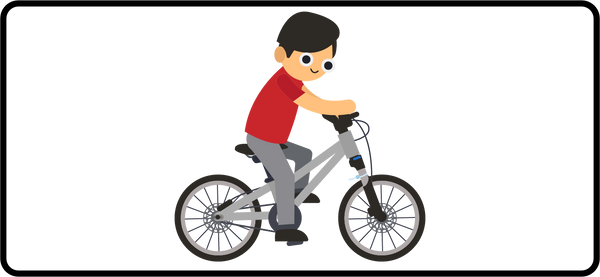
Rider settles their full weight on the bike without bouncing. - Push the zip tie to the seal. With the rider still on the bike, slide the zip tie (or O-ring) down until it just touches the fork seal.
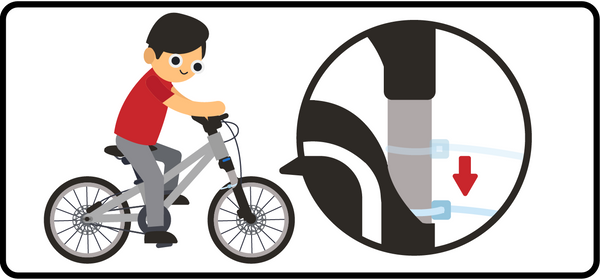
Slide the zip tie down to the seal while the rider stays on. - Measure. Have the rider step off carefully. The fork extends and carries the zip tie (or O-ring) up with it. Measure the gap between it and the seal. That gap is your sag.
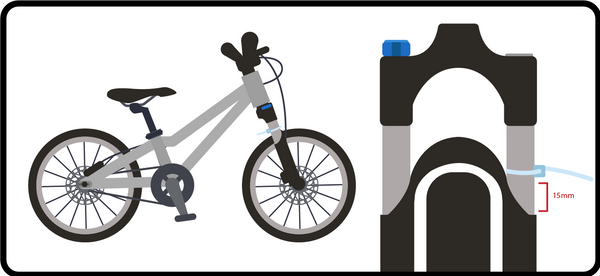
The gap between the zip tie and the seal is your sag.
How much sag to aim for. RST recommends setting sag to 15 to 25 percent of the fork's travel. That works out to:
| Bike | Travel | Target sag (15 to 25%) |
|---|---|---|
| Zulu Two HEIR MkII, F1RST 16 | 60 mm | 9 to 15 mm |
| Zulu Three MkII, F1RST 20 | 80 mm | 12 to 20 mm |
| Zulu Four MkII, F1RST 24 | 100 mm | 15 to 25 mm |
| Zulu Five MkII, F1RST 26 | 100 mm | 15 to 25 mm |
Lighter and newer riders often prefer the firmer end of that range (less sag), which keeps the bike feeling supportive and easy to steer. Many Prevelo riders start around 10 to 15 mm and adjust from there.
The Bravo dirt jump bikes are a different animal. Manitou does not publish a sag percentage for the JUNIT, and dirt jump riders generally run their forks firmer than trail riders so the bike pops off lips and pumps rollers well. Start from the pressure chart above, aim for a firm, supportive feel (roughly 10 to 15 mm of sag is a good starting point), and tune from there.
To adjust:
- Too little sag (too firm): release a little air with the bleed button on your shock pump, a few psi at a time.
- Too much sag (too soft): add a little air.
Re-seat the zip tie and repeat until you are in range. Then remove the pump, replace the valve cap, and go ride. Write down the pressure you landed on so you can return to it.
Step 3: Fine-tune on the trail
Sag is your starting point, not the finish line. After a few rides:
- Fork feels harsh or skips on small bumps: try a little more sag (a few psi less).
- Fork dives under braking or blows through its travel on drops: try a little less sag (a few psi more).
Change one thing at a time, in small steps, and re-check sag after each change. Also set your rebound (see below) to match: if you add air, you will usually want slightly slower rebound.
A special note for lighter and younger riders
Light riders get the most out of a careful setup, and Manitou specifically designed these forks with them in mind. They are the most sensitive to two things:
- Air pressure. On a light rider, a few psi is the difference between "perfect" and "way off." Make small changes, think 2 to 5 psi at a time, cycle the fork (Step 2, point 3), then re-measure sag before changing anything else. Take your time. It is worth getting right.
- Stiction (seal and bushing friction). Every fork has a little internal friction before it starts to move. A heavy adult overpowers it easily, but a light child may not, which can make the fork feel harsh and can hide a few millimeters of sag. A clean, well-maintained fork moves more freely:
- After every ride, wipe down the shiny upper legs (stanchions) and the seal area with a clean, soft cloth. This is Manitou's own guidance (wipe down the inner legs and the seal area after every ride) and it is good practice on the RST forks too.
- Keep the fork on its service schedule. The lubrication that keeps a fork gliding lives inside the fork and is refreshed during a lowers service, not by spraying anything on the outside. For the Manitou forks, the service lubricants are Manitou Slickoleum grease and Manitou Semi-Bath Oil (5/40W synthetic).
- Never spray household products such as WD-40 or other penetrating oils on the stanchions or seals. They wash out the fork's internal lubrication and can ruin the seals.
Know your controls
RST F1RST forks (Zulu Two HEIR MkII, Zulu Three MkII, Zulu Four MkII, Zulu Five MkII). Standing in front of the bike and looking down at the top of the fork:
- Lockout (left leg): firms the fork almost solid for smooth climbs and pavement. Turn or flip the knob to lock, and remember to unlock before descending.
- Air valve (right leg): under the cap marked "AIR." This is where you set sag with a shock pump.
- Rebound: controls how fast the fork returns after a bump. It is a small dial, usually near the bottom of a fork leg. If you add air, add a touch of rebound damping (slower).
Manitou JUNIT forks (Bravo Three, Bravo Four). These are air-sprung dirt jump forks:
- Air spring (Expert Air): one air valve, set for sag with a shock pump.
- Rebound: a dial on the fork leg; set it so the fork returns smoothly and controlled, not fast and kicky.
- Compression (ABS+ damper): a light tuning adjustment for how the fork resists harder, faster hits.
Still not sure?
Our support team knows these bikes inside out and loves helping you dial them in. If you are unsure which cap is the air valve, what pressure to run, or how the fork should feel for your rider, reach out and we will walk you through it.
Sources
- RST F1RST fork (pressure charts and adjustments): rstsuspension.com/products/f1rst-2
- Manitou JUNIT forks (starting pressures and service): Manitou JUNIT 32 service guide and the Manitou JUNIT overview.
